Condition Plugins for Visibility in Drupal 8-9

Hello there! In this new post I want to focus on a very interesting topic of Drupal, which pertains to its extension capabilities through its Plugins system. It is not a very extensive topic, but it is also true that there is not much documentation about it. This is a very common case when you’re building some kinds of Drupal Blocks in order to render specific data and you need that its visualization and its behaviour responds to special conditions.
Picture from Unsplash, user Benjamin Child, @bchild311
Table of Contents
1- Introduction
2- What are Condition Plugins
3- Existing Condition Plugins in your Drupal installation
4- Available Condition Plugins in Drupal Contrib Modules
5- Writing your own Condition Plugin
6- :wq!
1- Introduction
Every Drupal Site Builder works with blocks, blocks are a basic and essential piece of functionality in Drupal and a very important building element in Drupal-based projects. And one of the most important phases of working with blocks in Drupal is managing the rules for the visibility of this important resource: We need determine when show it and when hide it.
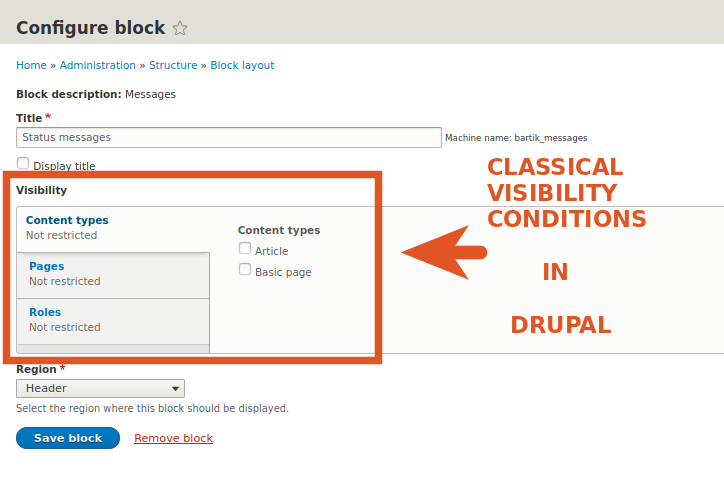
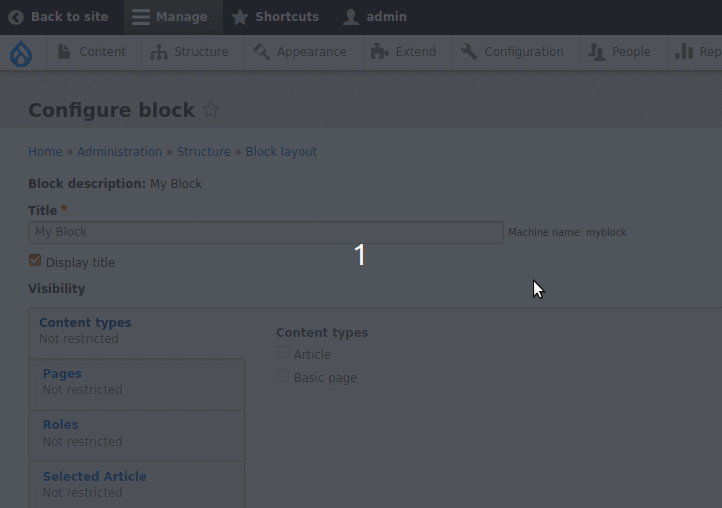
We have all had at one time or another, to work with visibility conditions for a Block. It happens when we’re using the config page of a Block in Drupal, seeing something like this:
Well, for this post I was thinking on writing about how to expand these visibility conditions for our own custom needs in a Drupal Project. We’re going to talk about the Condition Plugins in Drupal.
2- What are Condition Plugins?
Although there is not a lot of information on this subject, nor does it form part of the documented APIs of Drupal, We can assemble interpretative pieces about how this small extensible sub-system based on Drupal Plugins works.
Basically, we can say that Condition Plugins are an extensible way to generate new visibility conditions for Blocks in Drupal, based in the format of Plugins that you can implement following the Drupal rules for Plugins.
The Condition Plugins are context-aware (many of them requires explicit context in its annotations blocks), but let’s see some information located within the Drupal documentation:
From the Condition Plugin System, as was initially described in 2013:
“To implement a condition in a module create a class in {module}/src/Plugin/Condition/{ConditionName}.php and extend ConditionPluginBase (which implements ConditionInterface). The class must also declare a plugin annotation in its docblock comment."
And about the Contexts, from the Plugin Contexts Definition:
“Sometimes plugins require another object in order to perform their primary operation. This is known as plugin context. Using a practical example, almost all condition plugins require a context. Let’s look at the NodeType condition’s plugin definition […] The context_definitions key stores an array of named context definitions the condition requires in order to perform its “evaluate()” method."
Actually, the Condition Plugin it’s not a complicated concept, but it’s true that you need to know quite well some basic previous steps in order to reach here the Satori. These are key concepts for Drupal Development and maybe you’ll need understand in deep the next topics:
- Creating Custom Modules in Drupal.
- The Plugin API in Drupal.
- Annotations Based Plugins in Drupal.
- Guide: How to integrate JavaScript in Drupal 8-9
3- Existing Condition Plugins in your Drupal Installation
You can discover some existing Condition Plugins available in your Drupal installation from different core modules:
Current Condition Plugins in Core:
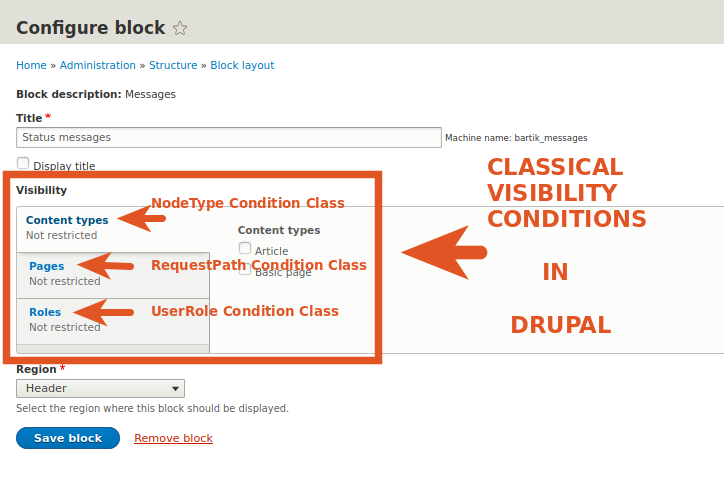
- NodeType Condition Class: namespace Drupal\node\Plugin\Condition, in core/modules/node
- RequestPath Condition Class: namespace Drupal\system\Plugin\Condition, in core/modules/system
- UserRole Condition Class: namespace Drupal\user\Plugin\Condition, in core/modules/user
These previous Plugins are the three basic items availables by default in a Block Visibility Configuration, I mean:
But there are a few more in other locations (in addition to some used in test classes):
- CurrentTheme Condition Class: namespace Drupal\system\Plugin\Condition, in core/modules/system
- Language Condition Class: namespace Drupal\language\Plugin\Condition, in core/modules/language
And the central Interface for Conditions:
- ConditionInterface: namespace Drupal\Core\Condition, in core/lib/Drupal/Core/Condition
4- Available Condition Plugins in Drupal Contrib Modules
As in Drupal Core you can find Condition Plugins in Contrib modules too. For instance, there are some modules developed by Cambrico with many resources within:
And one of the biggest contrib modules of Drupal -Webform- also provides its own Plugin for Conditions:
5- Building your own Condition Plugin
Ok, now let’s go to build something useful. We already know conceptually what they are, what they do and where cand find them. So is the time to implement Condition Plugins!.
Our Goals
For this case, I have come up with a very simple and straightforward idea:
We want to show a block only for nodes of type “Article” when they have checked a field.
In order to prepare this, I made the quickest way:
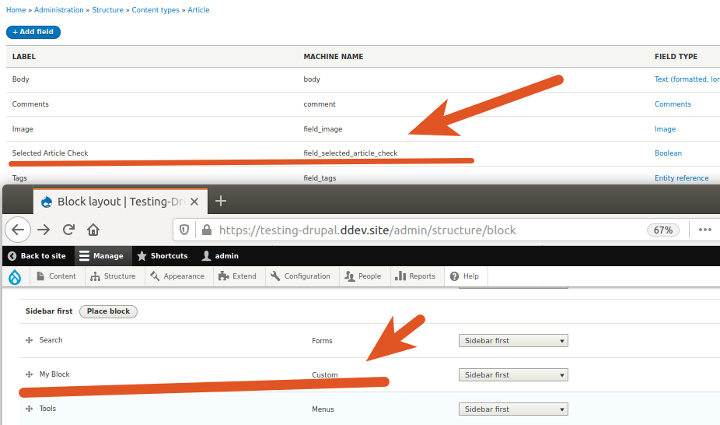
- First I added a new field for the content type “Article”, the new “field_selected_article_check”.
- Then I created a new custom block “My Block” in the most easy way, just clicking in /block/add.
- Finally I implemented scaffolding for a new custom module, called “visibility_conditions”
We’re going to make a new folder in path:/modules/custom/visibility_conditions/src/Plugin/Condition/
and creating the new file SelectedArticle.php This will be the new Plugin class and will have all the basic resources. Let’s see.
Annotations
In order to create a new vertical tab for the block configuration page, we hace to register our new Plugin, and in Drupal the Plugins uses annotations to register themselves and provide all the relevant information for indexing. For instance:
/**
 * Provides a condition for articles marked as selected.
 *
 * This condition evaluates to TRUE when is in a node context, and the node is
 * Article content type and the article was marked as selected article in a field.
 *
 * @Condition(
 *   id = "selected_article",
 *   label = @Translation("Selected Article"),
 *   context_definitions = {
 *     "node" = @ContextDefinition("entity:node", label = @Translation("node"))
 *   }
 * )
 *
 */
What about context? Well It’s a way to know where is running our resource. Some Drupal’s Plugins require context information to operate. In this case, we need to know if our Block is inside a node corpus, or not.
For the next lines, we have to extend the ConditionPluginBase Class and implement the ContainerFactoryPluginInterface Class:
class SelectedArticle extends ConditionPluginBase implements ContainerFactoryPluginInterface {
And this is the most relevant information from the top of our new class (as well as the ‘<?php’ operture tag). Let’s continue.
Configuration
Ok, our next step is define the configure by our new Plugin: what values are important and how we go to get these values.
For the first need, we build a basic method defaultConfiguration() from the mother Class. This will set the initial value of the new field in the tab:
 /**
   * {@inheritdoc}
   */
  public function defaultConfiguration() {
    // This default value will mark the block as hidden.
      return ['show' => 0] + parent::defaultConfiguration();
    }

  /**
   * {@inheritdoc}
   */
  public function buildConfigurationForm(array $form, FormStateInterface $form_state) {
    // Build a checkbox to expose the new condition.
    $form['show'] = [
      '#title' => $this->t('Display only in Selected Articles'),
      '#type' => 'checkbox',
      // Is using the previous config value as the default.
      '#default_value' => $this->configuration['show'],
      '#description' => $this->t('If this box is checked, this block will only be shown for Selected Articles.'),
      ];

      return parent::buildConfigurationForm($form, $form_state);
    }
And then we call to the submit function:
  /**
   * {@inheritdoc}
   */
  public function submitConfigurationForm(array &$form, FormStateInterface $form_state) {
    // Save the selected value to configuration.
    $this->configuration['show'] = $form_state->getValue('show');
      parent::submitConfigurationForm($form, $form_state);
    }
After that, we’ve built an extension for the Configuration Form of the visibility general block, adding a new item called show which contains the new element, a checkbox for select our new condition (or not).
Evaluate
Now we need a way for measure if our new condition applies or not and we’re using a function inherited from the mother class in order to evaluate the condition, returning TRUE or FALSE. It’s from ConditionBase Class, which implements ConditionInterface:
  /**
   * {@inheritdoc}
   */
  public function evaluate() {
    // First ensure that doesn't disable other blocks aren't using it.
    if (empty($this->configuration['show']) && !$this->isNegated()) {
      return TRUE;
    }

    // Gets the context value.
    $node = $this->getContextValue('node');

    // Then review if the node Article has setted the Selected Article field.
    if (($node->getType() == "article") && ($node->hasField('field_selected_article_check')) && ($node->field_selected_article_check->value)) {
      return TRUE;
    }
      // Finally if not exist marked value in Selected Article field.
      return FALSE;
    }
As you can see in the block above, we’re using a first part to ensure that if none of the above fields are checked, TRUE is returned and the block is displayed. This will ensure that by default if we have not activated the visibility of the block, we have it visible in general terms until we limit its visibility.
Summary
One more time, we have a function available from the mother class ConditionBase and required by ConditionInterface, just a method for expose descriptions about the works of the Conditions. These descriptions will not be available from the vertical tabs of the block configuration page, but will be only available from code.
  /**
   * {@inheritdoc}
   */
  public function summary() {
    // We have to check three options:
    // 1- Condition enabled.
    // 2- Condition enabled and negated.
    // 3- Condition not enabled.
    if ($this->configuration['show']) {
      // Check if the 'negate condition' checkbox was enabled.
      if ($this->isNegated()) {
        // The condition is enabled and negated.
        return $this->t('The block will be shown in all Articles except the Selected.');
      } else {
        // The condition is only enabled.
        return $this->t('The block will be shown only in Selected Articles.');
      }
    }
      // The condition is not enabled.
      return $this->t('The block will be shown in all Articles.');
    }
Some Futher Details
In the previous section, we took care of preparing a Summary, but this is only available at code level, it’s not visible in GUI. Could we improve the usability of our new element by adding this summary? Yes, it’s possible and for this we can rely on a jQuery function in Drupal (sorry).
I introduce you the function “drupalsetSummary”, I discovered it consulting problems in StackExchange and then I identified it in real cases like the JavaScript added for Nodes in the Drupal core. I haven’t found much information about it, so I can’t explain much more than this: “it serves to place summaries” ¯_(ツ)_/¯ . Well, ok.
The important thing is that I was playing with this function and it seems to work well for inserting elements. The pre-conditions are that JavaScript must be added to our custom module and that we must use the Drupal Behaviors format. Please review this Drupal - JavaScript integration guide: Drupal Behaviors in order to get more info about the Drupal Behaviors format and how implementing it, and here from this github gist you can play with some examples of Drupal Behaviors.
File: visibility_conditions.libraries.yml:
block_special_articles:
  js:
    js/selected_articles_conditions.js: {}
  dependencies:
    - block/drupal.block
File: selected_articles_conditions.js
The Drupal Behavior:
  /**
   * Provide the summary information for the block settings vertical tabs.
   *
   */
  Drupal.behaviors.blockSettingsSummarySelectedArticles = {
    attach: function () {
      // Check if the function drupalSetSummary is available.
      if (jQuery.fn.drupalSetSummary !== undefined) {
        // Add the summary on tab.
        $('[data-drupal-selector="edit-visibility-selected-article"]').drupalSetSummary(checkSummary);
      }
    }
  };
And the function for setting the strings of summary:
function checkSummary(context) {
    // Check if the condition has been selected.
    var selectedCondition = $(context).find('[data-drupal-selector="edit-visibility-selected-article-show"]:checked').length;
    // Check if the negate condition has been selected.
    var selectedNegate = $(context).find('[data-drupal-selector="edit-visibility-selected-article-negate"]:checked').length;

    // Reviews scenarios.
    if (selectedCondition) {
      if (selectedNegate) {
        // Condition and Negation were selected.
        return Drupal.t("The block will be shown in all Articles except the Selected.");
      }

      // Only the condition was selected.
      return Drupal.t("The block will be shown only in Selected Articles.");
    }

    // The condition has not been enabled and is not negated.
    return Drupal.t('The block will be shown in all Articles');
  }
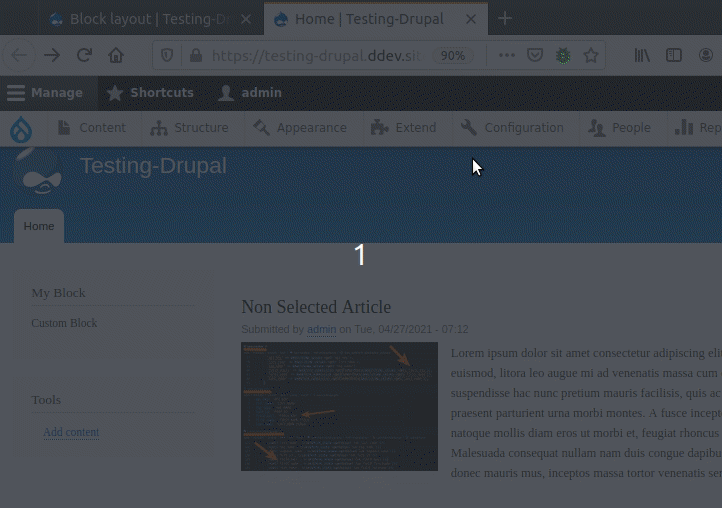
Now you need enable the new custom module by drush en -y visibility_conditions from your command line. Clear cache by doing drush cr and…That’s all! interesting? See the new Condition Plugin in action:
And the JavaScript rendering the info about summary:
It’s true that it requires basic knowledge of other Drupal elements (Annotations, Plugins, JavaScript Libraries, Drupal Behaviors…) but in itself, the result is quite interesting. Now we can build our own visibility conditions Plugins!
I have uploaded this test module to my custom modules repository for testing, in Gitlab. You can download it from here. And remember, don’t use these modules in production environments!